
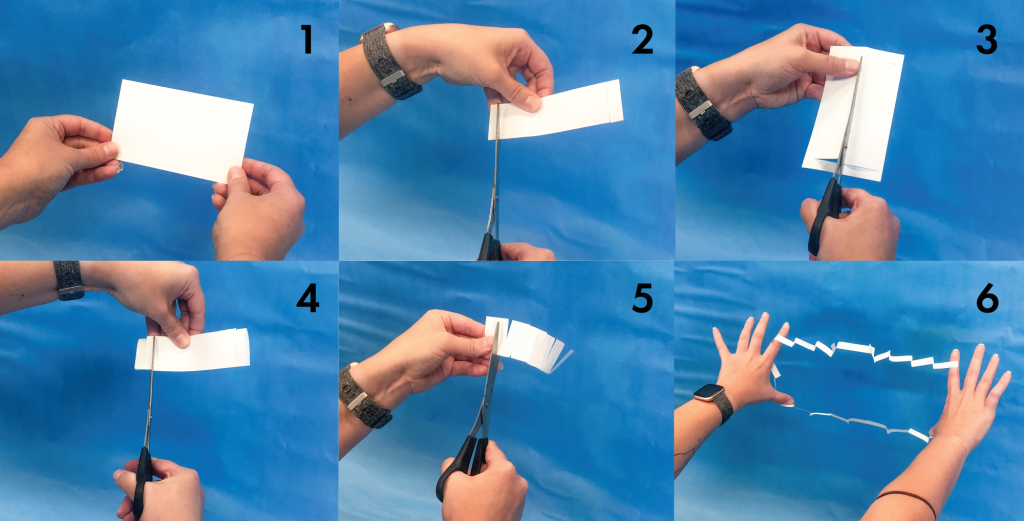
ECHO Science Spotlight: Explore Surface Area!
What: When you look at a rubix cube you will see 6 sides. The surface area of this cube is the total area of all of those 6 sides. Surface area is one way of explaining how large a three dimensional object is. Try this easy experiment at home to see how you can change the surface area of an index card with only a pair of scissors.
Materials: index card, scissors.
Directions: Take the card and fold it in half the long way. Start at the fold and cut one cm from the edge of the paper, be careful not to cut all the way through. Repeat this process on both sides. Unfold the card and cut along the crease but don’t cut the slits you created in the last step. Fold the note card again and start making a cut one cm from the edge. Turn the note card over and make a cut going in the opposite direction one cm from the first cut. Alternate this pattern the length of the index card. Again, be careful not to cut all the way through. Now carefully unfold and open the index card into a circle.
How It Works: A 3 in. x 5 in. index card may seem small but it has a total surface area of 15 square inches. By cutting the index card in the above pattern, you are redistributing the surface area.
Want more? Research it! What happens when you make cuts that are closer together? Experiment and let us know what you find out. Email ECHO at info@echovermont.org to let us know what you find and have a chance at being featured in next week’s edition of the Burlington Free Press and our Facebook Page! We look forward to learning about your research.
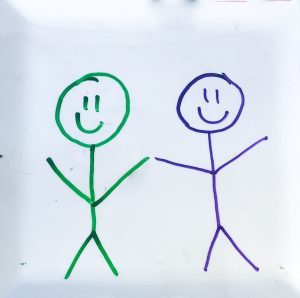
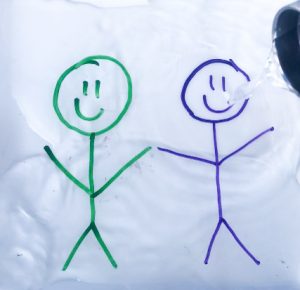
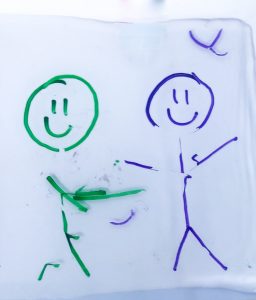
Try this fun experiment about Polymers!
Materials: Dry erase marker(s), plate, water.
Directions: Use the dry erase marker to draw something on a plate. It could be a word or a picture, be creative! Take some water and pour enough to cover the surface of the plate. You’ll notice something peculiar happening with the marker drawing!
How It Works: The marker is being lifted right off the plate and dancing in the water. This happens because the polymer found in dry erase markers does not actually allow the ink to stick to the surface of the plate. This allows the water to move underneath the ink of the dry erase marker. The ink is lighter than the water and therefore can float.
Want more? Research it! Try this experiment with lots of different colors of dry erase markers. Is there a color that floats the best? Email ECHO at info@echovermont.org to let us know what you find and have a chance at being featured in next week’s edition of the Burlington Free Press and our Facebook Page! We look forward to learning about your research.
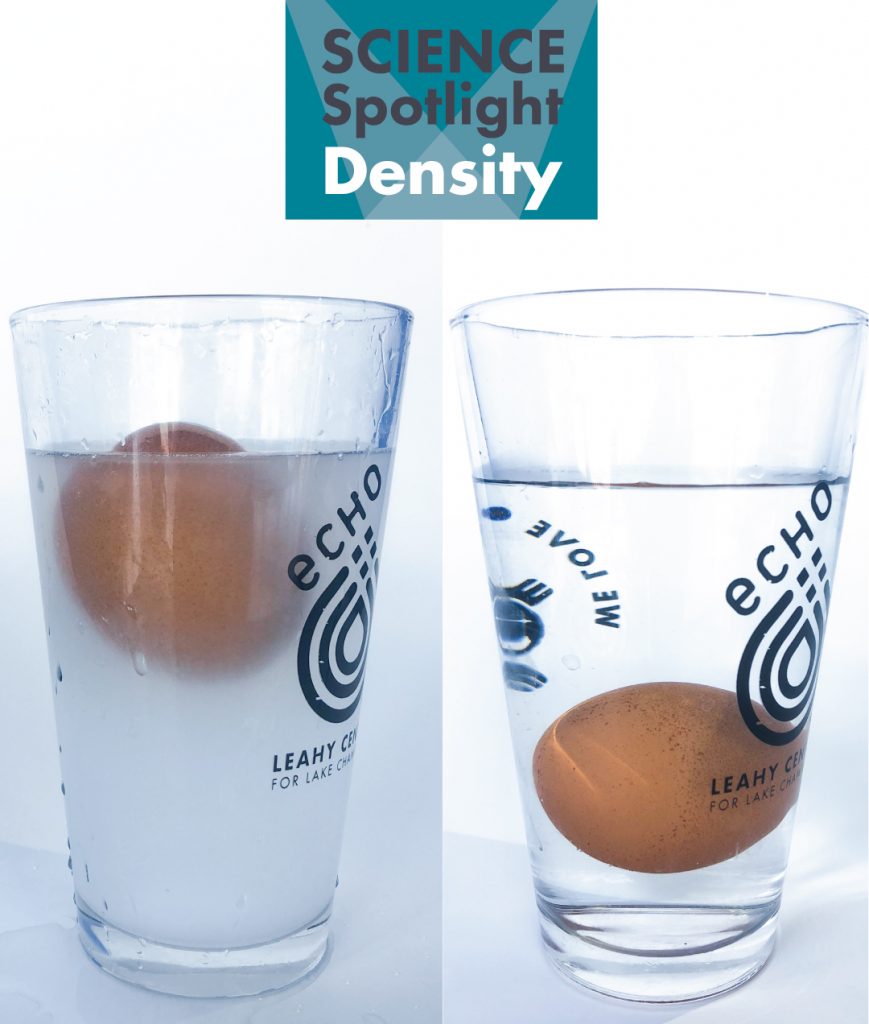
Do Eggs Always Float?!
What: Earlier this summer we learned about density. Density is the amount of mass in a given volume, or amount of space. Mass is dependent on the number of molecules in an object. Objects that are more dense than water will sink and objects that are more dense will float! This time, we’ll experiment with density using an egg and see how it reacts in different solutions.
Materials: Egg, glass, water, salt.
Directions: First we need to decide if an egg is more or less dense than water. Place the egg in a glass filled with water. Does the egg sink or float? After you see what happens, take the egg out of the glass and dump in a bunch of salt – a good ¼ of a cup will probably do the trick but you may need to add more. Mix the salt in the water. Some of the salt might not totally dissolve in the water and that’s okay. Now place the egg back in the glass, does the egg sink or float? If your egg is still sinking it means that you will need to add more salt to the solution.
How It Works: What we’re seeing is that when the egg is in regular water it sinks to the bottom of the glass. This happens because an egg itself is denser than water. When you add salt to the solution, you are increasing the mass without changing the volume by very much. This creates a solution with a greater density. The egg will float in the salt water solution because it is less dense!
Want more? Research it! Do you think you could change the density of water in a different way? Experiment and let us know what you find out. Email ECHO at info@echovermont.org to let us know what you find and have a chance at being featured in next week’s edition of the Burlington Free Press and our Facebook Page! We look forward to learning about your research.
When the Statue of Liberty was first gifted to the United States from France, it was a much
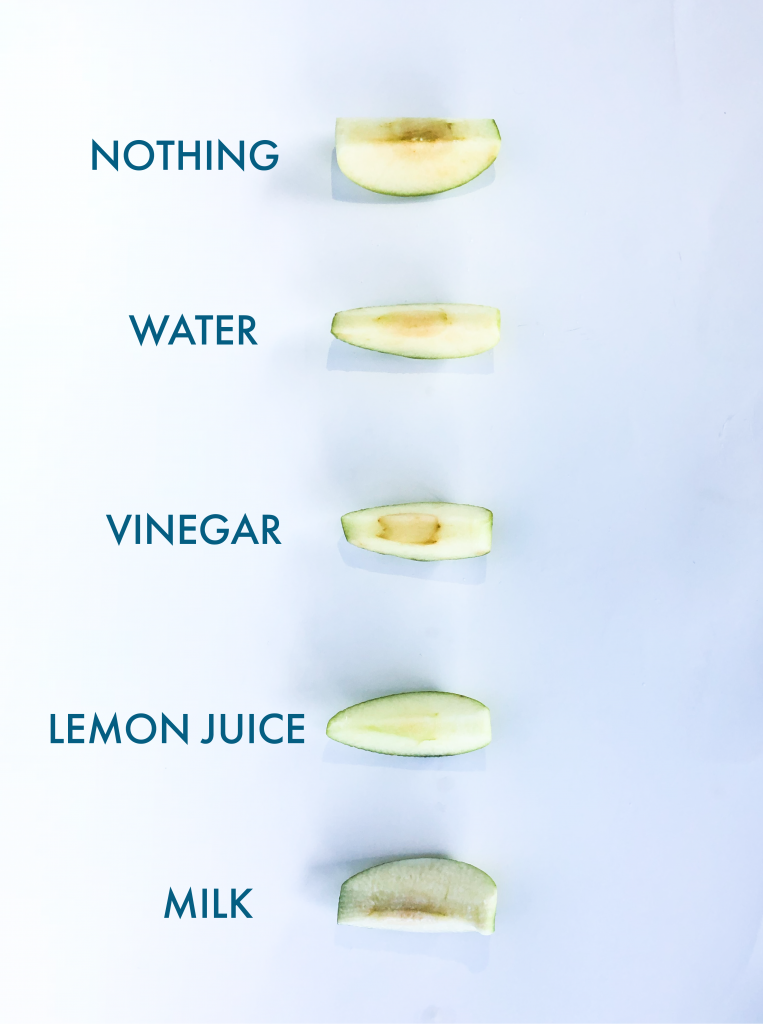
different color than it is today! The statue is made out of a metal known as copper. However, over time, the statue was exposed to the elements of the outside world and turned green! This happens due to oxidation. Oxidation is the process by which an object gains oxygen. Due to a chemical reaction between the copper, water, and air, the statue turned green. This green color is called patina and is just a layer on top of the copper. It keeps the integrity of the copper metal intact and prevents any further damage. On a much smaller scale, we can see oxidation with an apple! When we slice it in the morning and then go to eat our lunch in the afternoon, we see thatthe apple turns brown. This occurs because the apple contains an enzyme that undergoes a chemical reaction with oxygen. Normally this enzyme is protected from exposure because there is an apple peel – but when sliced, that peel can’t protect the apple. Try this experiment below to see if you can slow the oxidation process for an apple at home!
Try this fun experiment about Oxidation!
Materials: 1 apple, Vinegar, Lemon Juice, Water, Milk.
Directions: Take 6 plastic ziplock bags and write on each one the liquids that you will use (mentioned above). On one bag, write that it is a control and no liquid was added. Cut the apple into slices and put one slice in the bag. Pour in enough liquid to cover the apple. Be patient and observe what happens! After an hour you will notice that some liquids prevented the apple from turning brown. Why does this happen?
How It Works: The lemon juice works best to prevent oxidation because it is full of ascorbic acid! This acid will react with the oxygen in the air before the flesh of the apple has a chance to. This prevents the apple from experiencing the chemical reaction and stays nice and fresh.
Want more? Research it! Fruit browning is an example of an oxidation and reduction reaction where electrons are being transferred between two things. What are other types of oxidation reduction reactions? Email ECHO at info@echovermont.org to let us know what you find and have a chance at being featured in next week’s edition of the Burlington Free Press and our Facebook Page! We look forward to learning about your research.
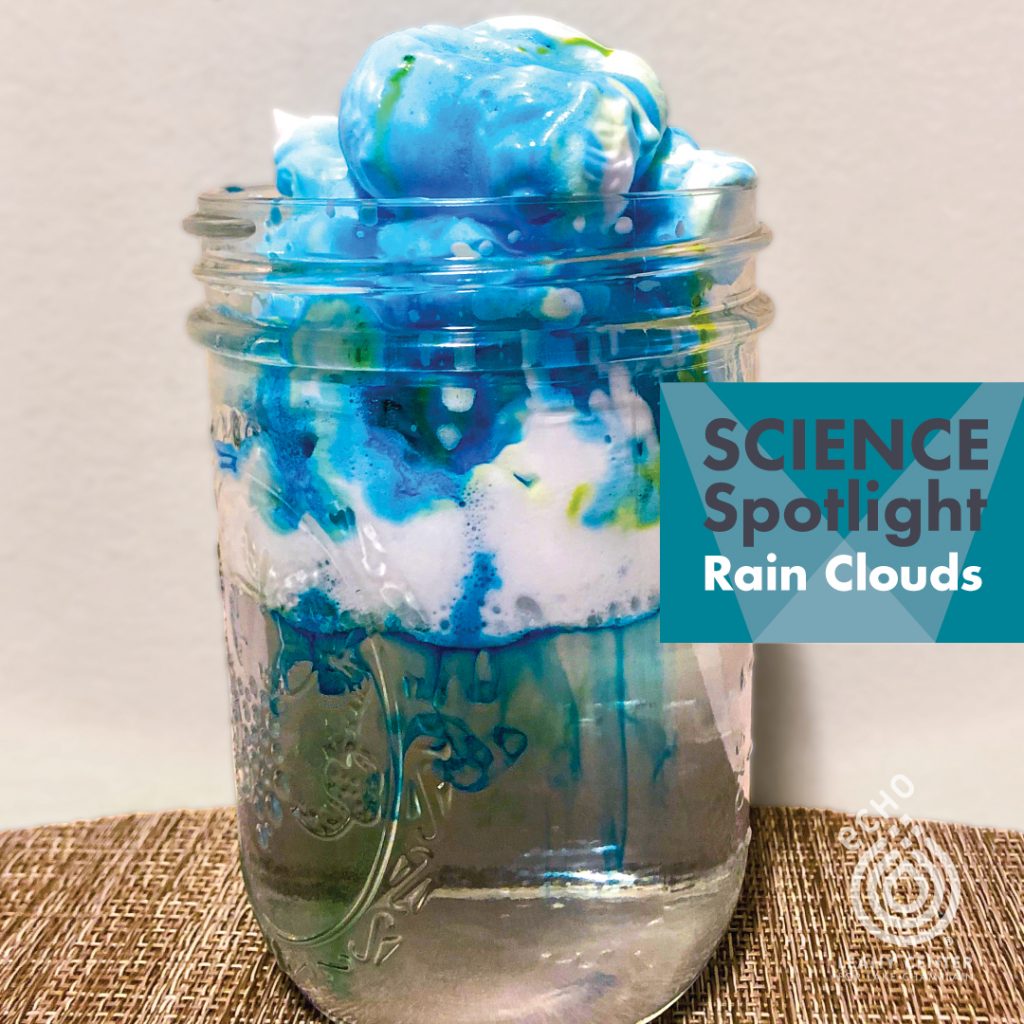
Vermont is blessed to have some pretty spectacular weather in the summertime. However, not everyday can be perfect and we are sometimes stuck with a rain storm. The clouds in the sky form from water or ice that has evaporated from Earth’s surface. When water evaporates – rises from the Earth’s surface into the atmosphere – it is in its gaseous state, water vapor. When water vapor cools and condenses, turns back into a liquid or ice, it helps form the cloud. To do this, there needs to be a little speck of dust or pollen for the water to condense around. This is what forms the cloud! Within the cloud, water vapor continues to condense into droplets, which causes the cloud to grow and get heavier. Once the cloud gets too heavy with water droplets, some of that water falls back to Earth as rain. Use the materials below to make your own rain clouds at home!
Try this fun experiment about Rain Clouds!
Materials: Shaving cream, 2 glasses, water, food coloring.
Directions: Fill a large glass with ¾ water. Add shaving cream to the top of the glass, creating what looks like a puffy cloud! Add a couple drops of food coloring to the second glass of water and mix together. Slowly pour the food coloring water onto the shaving cream and wait to see what happens as the “cloud” fills with water!
How It Works: The shaving cream cloud gets heavier as you add the food coloring. This allows for the food coloring to sink through the cloud and release into the water, depicting what happens with rain outside! When the cloud is too heavy, some of the water falls back down to Earth.
Want more? Research it! We know how water falls from the sky as rain, but how does it work when it snows? Do some research and let us know! Email ECHO at info@echovermont.org to let us know what you find and have a chance at being featured in next week’s edition of the Burlington Free Press and our Facebook Page! We look forward to learning about your research.

It’s always nice to enjoy a nice cold glass of lemonade on a hot summer day. However, usually we need to add sugar to our lemon juice to make it worth drinking! This is because lemons arevery acidic and sour. Most liquids are either an acid or a base. The difference is their ions! Acids are composed of several hydrogen ions and bases are composed of many hydroxide ions. Scientists use a pH scale to determine whether a liquid is more acidic or basic. The pH scale is a chemical detector for the number of hydronium and hydrogen ions in a liquid and ranges from 0-14. The lower the number, the more acidic something is and the higher the number the more basic. We see acids all the time in real life. Acids are incredibly good at breaking things down. In fact, acid is how we break down the food we eat into nutrients! Our stomachs use hydrochloric acid to eat away at, or digest, the food that we decided to have for breakfast. Let’s see what other kinds of things acids can break down with this experiment that you can try at home!
Try this fun experiment about everyday acids and bases!
Materials: Egg, glass of vinegar, time.
Directions: First, this experiment needs patience; it will take about 1-3 days to complete! You will need to fill a glass with vinegar and then place the egg in the glass. Then, let the egg sit for 1 to 2 days. You can check in on your egg a few times, but don’t touch it. After it’s been a couple of days, carefully remove the egg from the vinegar. The shell is completely gone and now your egg is almost like rubber!
How It Works:The acid in the vinegar reacts with the shell of the egg, which is made of basic calcium carbonate. When the calcium carbonate and vinegar react, carbon dioxide is formed which is what causes all the bubbles around the egg during the experiment. Eventually the egg shell completely dissolves in the vinegar and what is left is the membrane of the egg. This membrane makes the egg appear to be rubbery and if you’re careful you can even bounce your egg.
Want more? Research it! Now that you’ve dissolved the egg shell, try putting the egg in corn syrup for another day and tell us what happens! Did the egg shrink or enlarge? Email ECHO at info@echovermont.org to let us know what you find and have a chance at being featured in next week’s edition of the Burlington Free Press and our Facebook Page! We look forward to learning about your research.
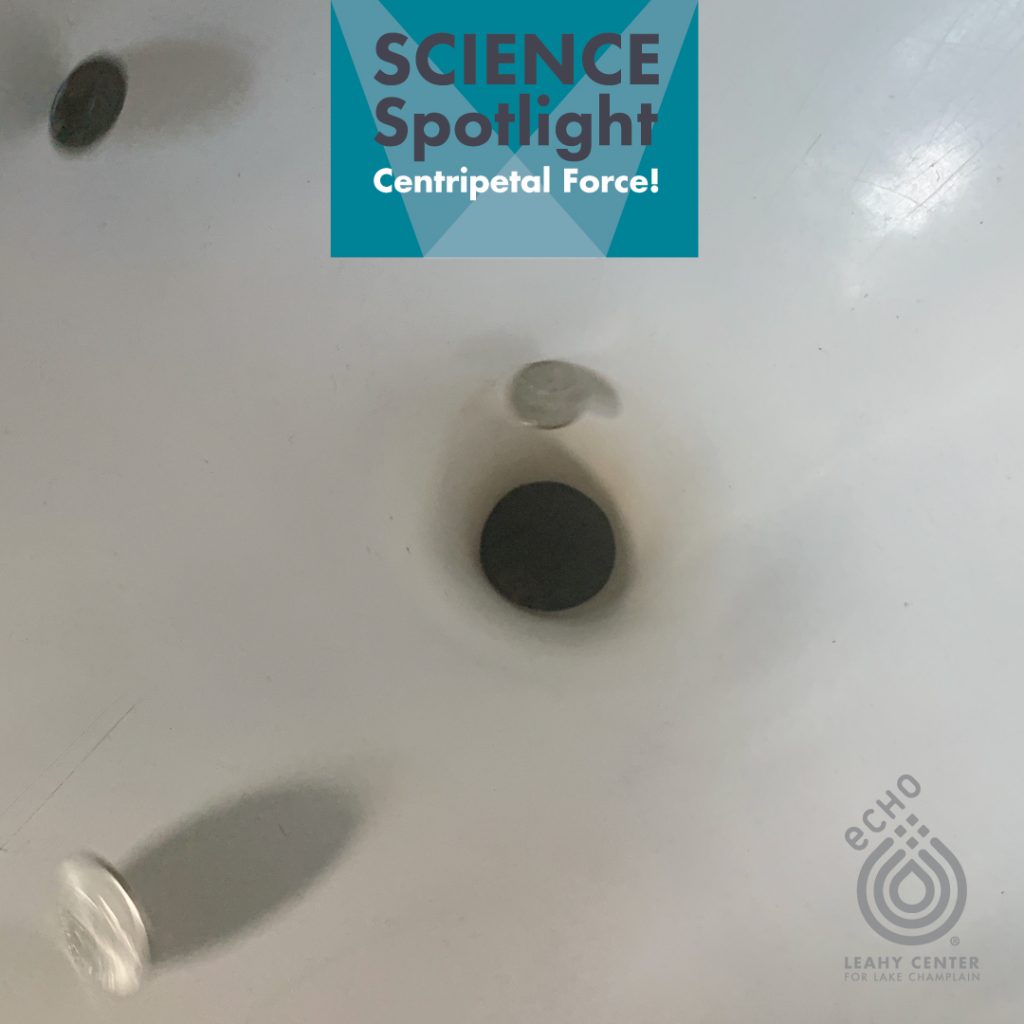
Have you ever thrown your spare change into a coin vortex like the one we used to have in the gift shop at ECHO? When you put a coin in this, the coin spins around and around until eventually it reaches the bottom and goes through the hole in the center. This coin is demonstrating centripetal force. While an object moves due to velocity, or it’s speed in a certain direction, centripetal force is the force that keeps the object moving in a circular path. It’s centripetal because the force is always being pulled towards the center of the circle. Since we live on Earth, objects are also going to have other forces acting on them, like friction and gravity. The penny makes its way to the hole because friction slows it down. If you were to observe this penny in space, it would just keep moving in a circle! But alas, you wouldn’t survive in space (well, without a space suit or access to the International Space Station), so you will have to experiment with centripetal force the best we can with this experiment that you can do right at home!
Try this fun experiment about Centripetal Force!
Materials: Wine glass or wide mouth glass, marble or small ball.
Directions:Put the marble inside the wine glass and spin the marble around. Now try putting your hand on the mouth of the glass and turning it upside down. Keep your hand on the mouth of the glass as you begin to spin the ball again. When the ball is moving inside the glass, remove your hand, but keep spinning, and watch centripetal force in action!
How It Works: While inside the glass, the marble is creating an outward “pushing” force against the glass. The glass is providing an inward “pushing” force that keeps the marble moving in a circular motion. Centripetal force will keep the ball following this curved path. However, gravity is still the superior force and when you stop spinning the glass or slow down, the ball will eventually fall out!
Want more? Research it! How do astronauts use Centrifuges to prepare for the centripetal force they’ll feel in space? Email ECHO at info@echovermont.org to let us know what you find and have a chance at being featured in next week’s edition of the Burlington Free Press and our Facebook Page! We look forward to learning about your research.
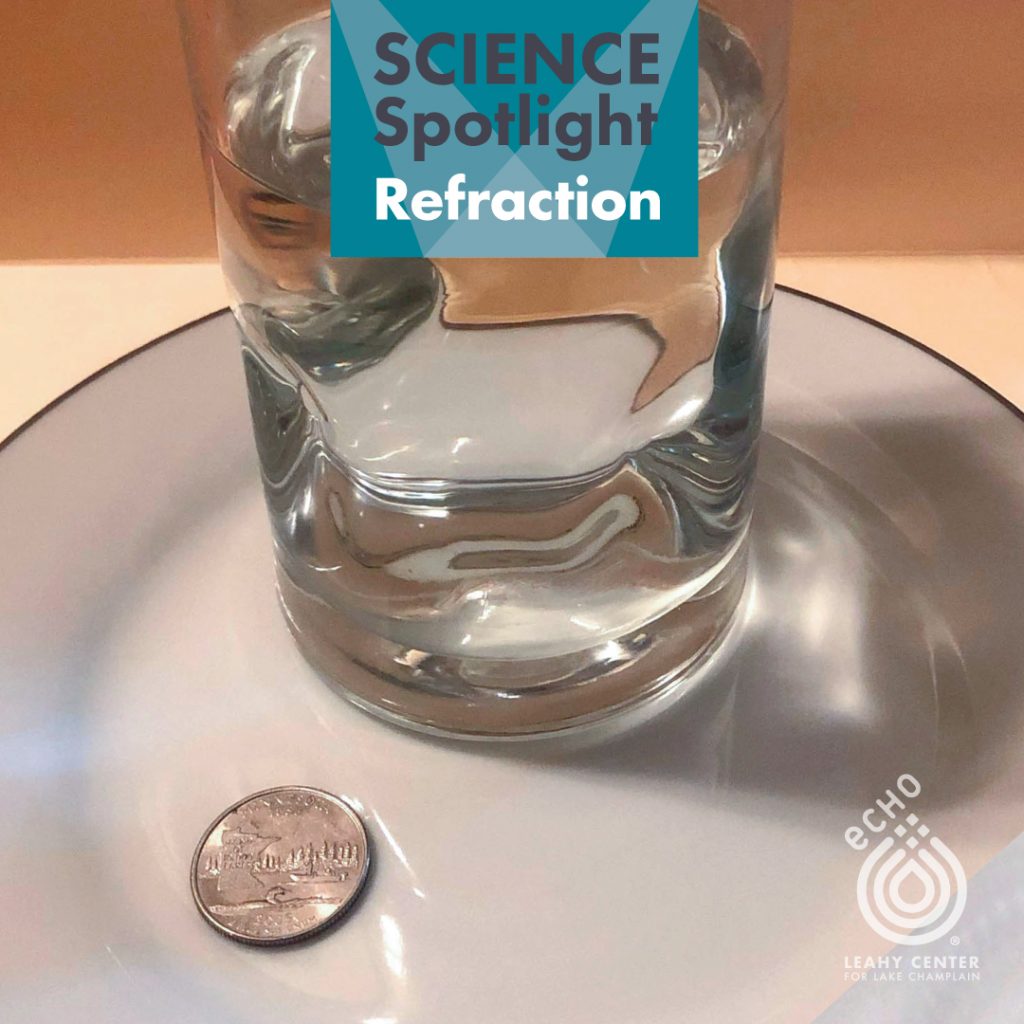
Sometimes when you look into a swimming pool it’s difficult to tell how deep the water actually is. If you grab something long, like a stick, you can use it to test the depth of the water. Upon putting it in the pool though you might notice something funky. The stick looks like it bends! This is due to light refraction. Light refraction is caused when the ray of light travels through different mediums and slows down or speeds up. In the case of this stick in the pool, water and air are two different mediums. When light travels through air it can move quickly, but as soon as it travels through water it slows way down. Molecules in the air are spread out, which is why little refraction occurs through air. However, the water molecules are closer together and this makes it more difficult for light to travel through the. Similarly, we have a much easier time moving through air than we do through water! When the light waves slow down, it will appear as though the stick has bent, but we know that it is still straight. Our eyes trick us into seeing the stick as bent. You might not have a pool at home to try this with, but you can try it on a much smaller scale!
Try this fun experiment about Light Refraction!
Materials: Straw, Scissors
Directions: Place a penny on a flat surface and put the glass on top of it. Take the plate and put it on top of the glass. You can still see the penny. Now remove the plate and fill the glass with water. Once you have filled the glass, put the plate back on top. Do you still see the penny now?
How It Works: Light can travel easily through the air which is why we could see the penny when the glass was empty. When we added water to the glass, the light waves slow down. These light waves are refracted and can’t make it to our eyes! The glass also refracts the light even more and the image ends up closer to the top of the glass. With the plate on top of the glass, we cannot see the penny! Remove the plate and look straight down. Sure enough, the penny is still there.
Want more? Research it! How does light refraction create rainbows? Do some research and let us know! Email ECHO at info@echovermont.org to let us know what you find and have a chance at being featured in next week’s edition of the Burlington Free Press and our Facebook Page! We look forward to learning about your research.
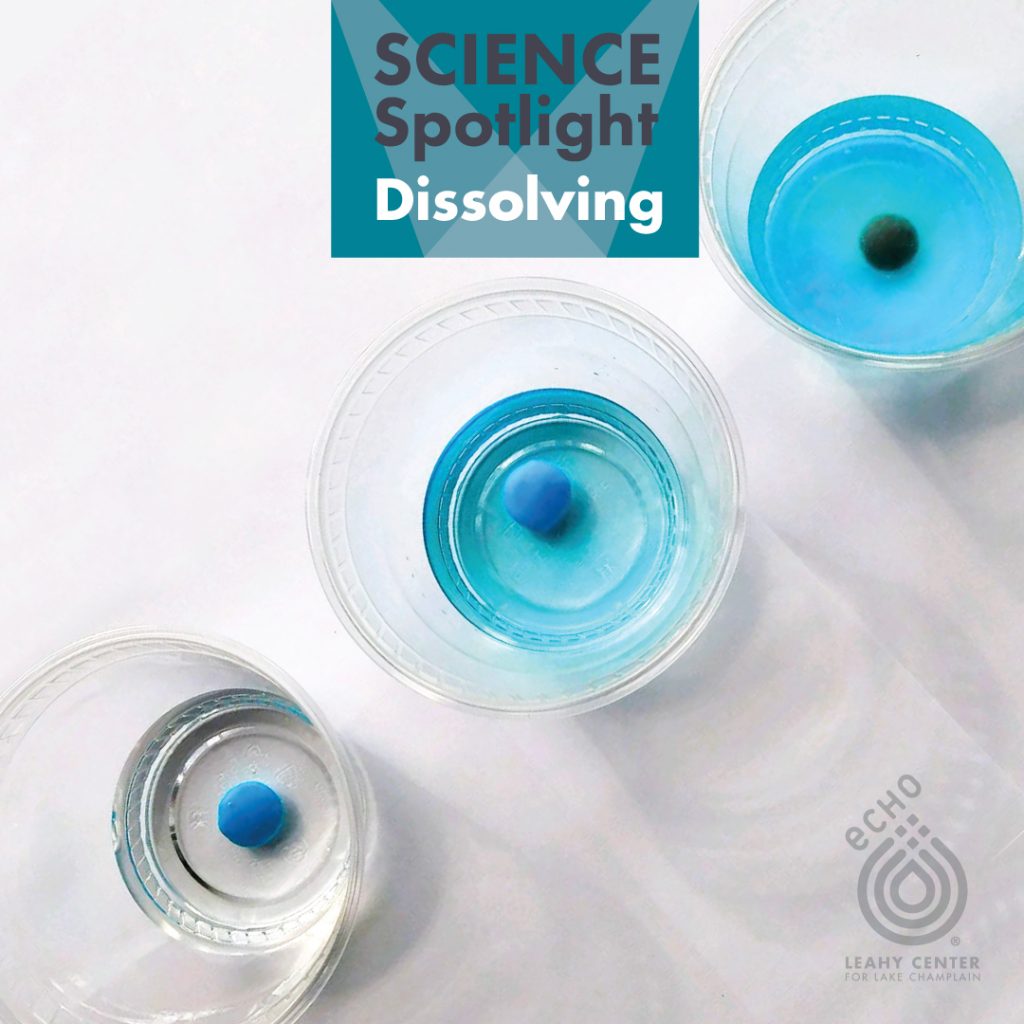
Have you ever helped with cooking and gotten oil on your hands? It’s hard to get off! Rinsing with water does not work; you need to use soap. The reason is the molecules that oil and water are made of. Everything in our world is made of molecules, tiny parts we can’t see. But not all molecules are the same! Because of the way the parts of the molecules stick together, some molecules, called polar molecules, are like magnets, while others are not. Polar molecules interact with each other, like how a magnet will stick to your refrigerator. But just like a magnet won’t stick to a piece of wood, polar molecules won’t interact with nonpolar molecules. This is the secret to oil and water! Water is a polar molecule, while oil is not. They don’t interact, so water won’t rinse the oil off your hands. You can explore what kind of molecules different liquids are made of by seeing how they interact with other things. In this sweet experiment, we are exploring how 3 colorless liquids interact with candy-coated chocolates.
Try this fun experiment about Dissolving Candy!
Materials: Candy-coated chocolates (like M&Ms), 3 clear cups, water, oil (colorless like baby oil is best) and isopropyl alcohol, 70%.
Directions: Pour equal amounts of water, oil, and alcohol in each of the 3 cups. Make a prediction about what will happen to the M&M in each liquid, then place a candy in each cup. For the best results, use the same color candy in all 3 cups. Swirl the cups and make observations. What color is the water? What happened to the candy coating?
How It Works: The candy coating on chocolates like M&Ms is made of sugar and food coloring. The sugar is made of a polar molecule, just like water, so the sugar and water interact. This causes the sugar and food color to dissolve, or melt, into the water. The alcohol is less polar than water, so it dissolves some of the candy coating, but more slowly and not as well. The oil is made of a different kind of molecule that does not interact with the sugar in the candy coating, so nothing happens.
Want more? Research it! How do molecule types impact what can get in and out of cells? Do some research and let us know what you find! Email ECHO at info@echovermont.org to let us know what you find and have a chance at being featured in next week’s edition of the Burlington Free Press and our Facebook Page! We look forward to learning about your research.
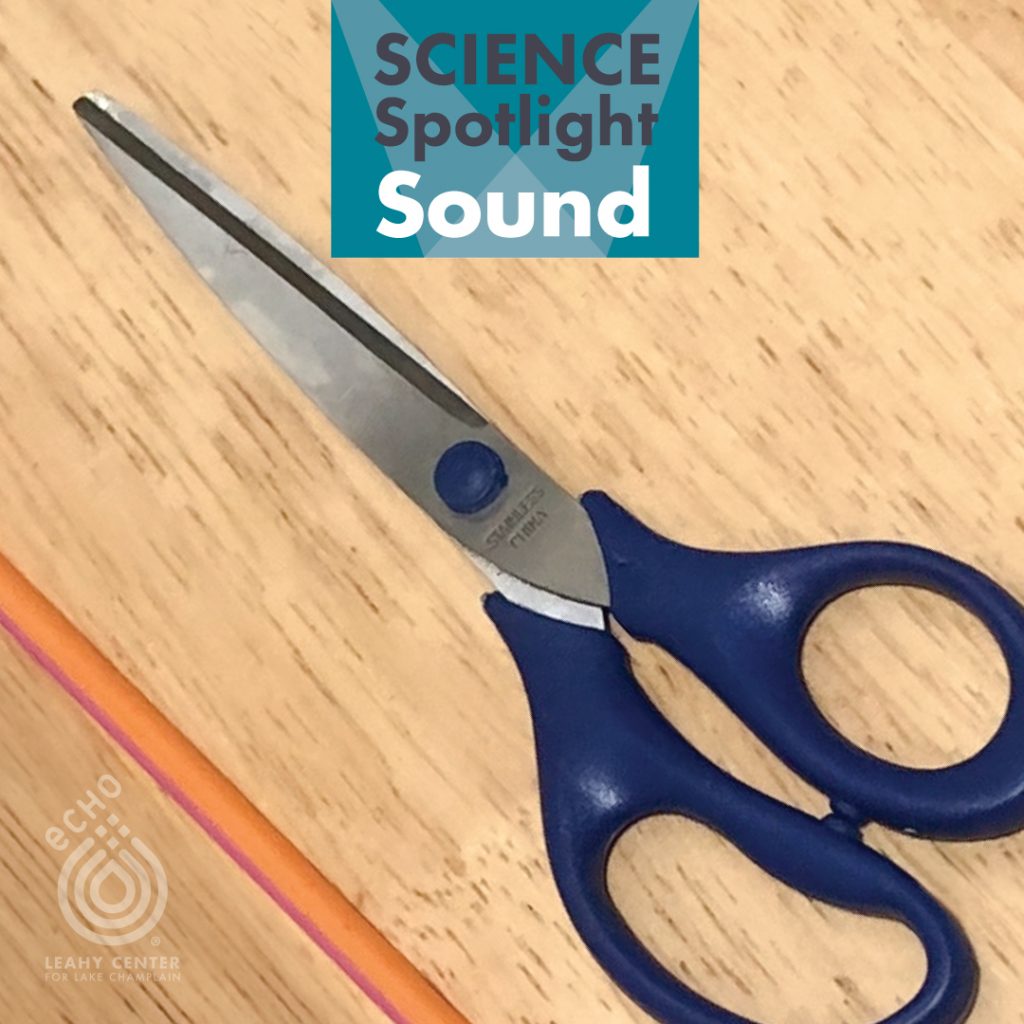
It takes incredible skill and commitment to play a musical instrument, especially an instrument that requires a double reed like the oboe! Instruments rely on the vibrations of sound waves in order to produce sweet, soothing tunes. Sound waves are formed when molecules vibrate. The surrounding medium, whether that is a solid, liquid, or gas, begins to vibrate too, moving the sound forward. When you are playing an instrument, sound is produced by air molecules vibrating back and forth, sending waves throughout the air. The air molecules do not move with the waves, they are merely bumping into each other and returning to their original position. When we hear something, whether it’s our parents telling us to clean our rooms or listening to a symphony orchestra, we are sensing these vibrations in the air. When these vibrations move fast, we hear higher pitched sounds. When they move slower, we hear lower pitched sounds. You create sound waves every time you speak, but what about music? Do you think that you would make a good oboe player? Give this experiment below a try to make some sound musical waves of your own!
Try this fun experiment about Sound!
Materials: Straw, Scissors
Directions: Flatten one edge of the straw. Take your scissors and cut at an angle on both sides of the flatten edge to form a small triangular point, half an inch or so. Blow through the straw along this cut edge. It’s difficult to do, so don’t go too fast or blow too hard at first. When you get the hang of making noise, try cutting the straw shorter and see what happens!
How It Works: You’re making music – well, more of a squawk! This is how double reed instruments can work. When you blow into the straw you are creating vibrations with the flattened edge. These vibrations are then passed through the straw, which acts as an air column. The shorter you cut the straw, the smaller the air column becomes and the faster the air moves. This creates a higher pitch!
Want more? Research it! This experiment helps explain how double reed instruments work, but how does something like a piano use sound waves to produce music? Do some research and let us know! Email ECHO at info@echovermont.org to let us know what you find and have a chance at being featured in next week’s edition of the Burlington Free Press and our Facebook Page! We look forward to learning about your research.
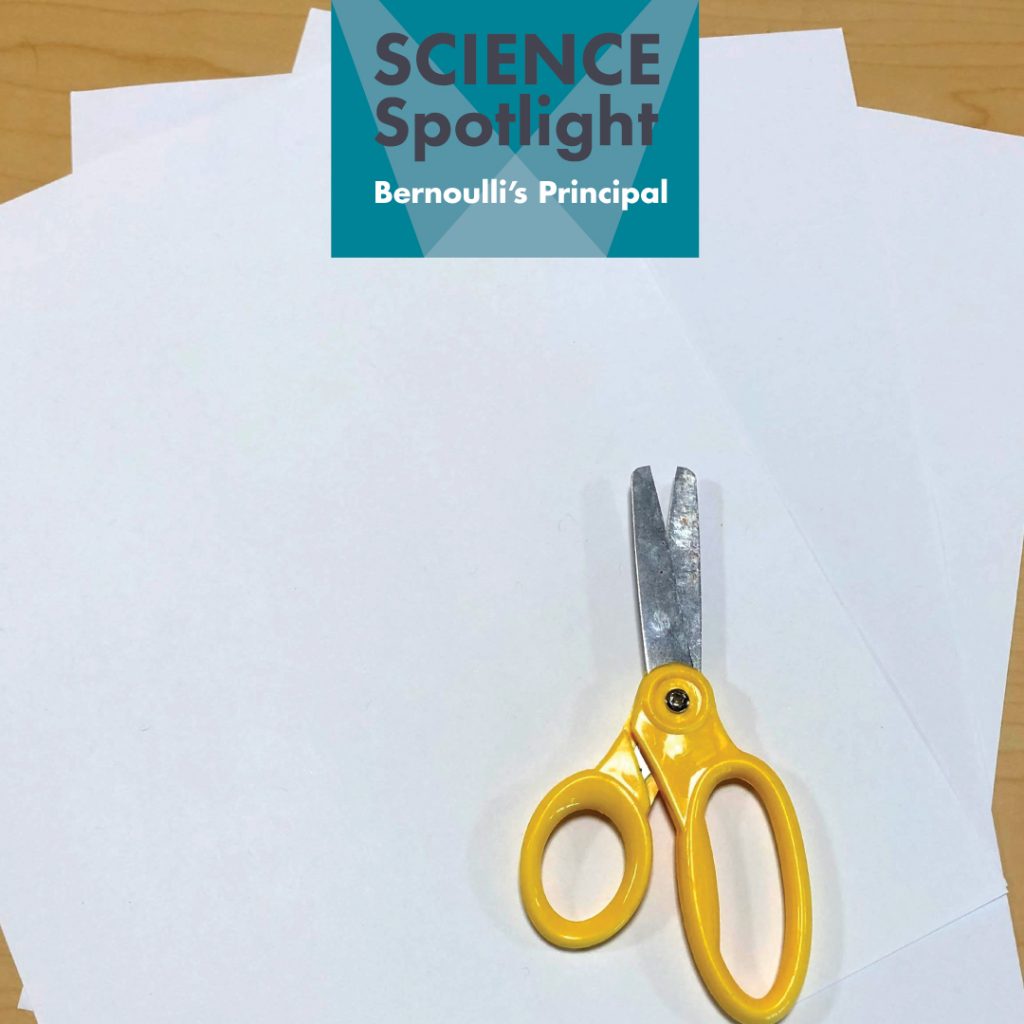
If a bird is in a tree and decides to go explore somewhere else, it takes off and elegantly flies away. However, if we did the same thing we wouldn’t fly. We would fall straight to the ground! Birds have specially designed wings that help them accomplish flight, something that our bodies are not able to do. With these wings and help from the Bernoulli Principle, we can see how they work! The Bernoulli Principle states that as air moves around an object it creates different pressures on that object. Faster air means less pressure and slower air means more pressure. Bird wings are curved.Due to this curvature, the air that passes over the top of the wing needs to move faster. As Bernoulli states, faster moving air will cause less air pressure. The slower moving air on the bottom side of the wing will cause more air pressure. If there is more air pressure pushing up from below the wing, the bird gets lifted up and it can fly away! Do you want to see Bernoulli’s principle in action? Try this easy experiment at home!
Try this fun experiment about Bernoulli’s Principle!
Materials: Paper, scissors.
Directions: Cut the paper into two stripes. First, make a prediction. What do you think will happen when you blow between two pieces of paper? Now, try it! Take a piece of paper in each hand, holding the short edge, and hold them up to your mouth. Each piece of paper should be at the edge of your mouth. Blow between the two pieces of paper. Did what you expect to see happen?
How It Works: Bernoulli’s principle taught us that fast air has less pressure on an object. By blowing air between the two pieces of paper, you decreased the amount of pressure and the air on the outside of the paper was able to push it inwards!
Want more? Research it! How do airplanes stay in the air when they’re flying? Do some research and let us know what you find! Email ECHO at info@echovermont.org to let us know what you find and have a chance at being featured in next week’s edition of the Burlington Free Press and our Facebook Page! We look forward to learning about your research.
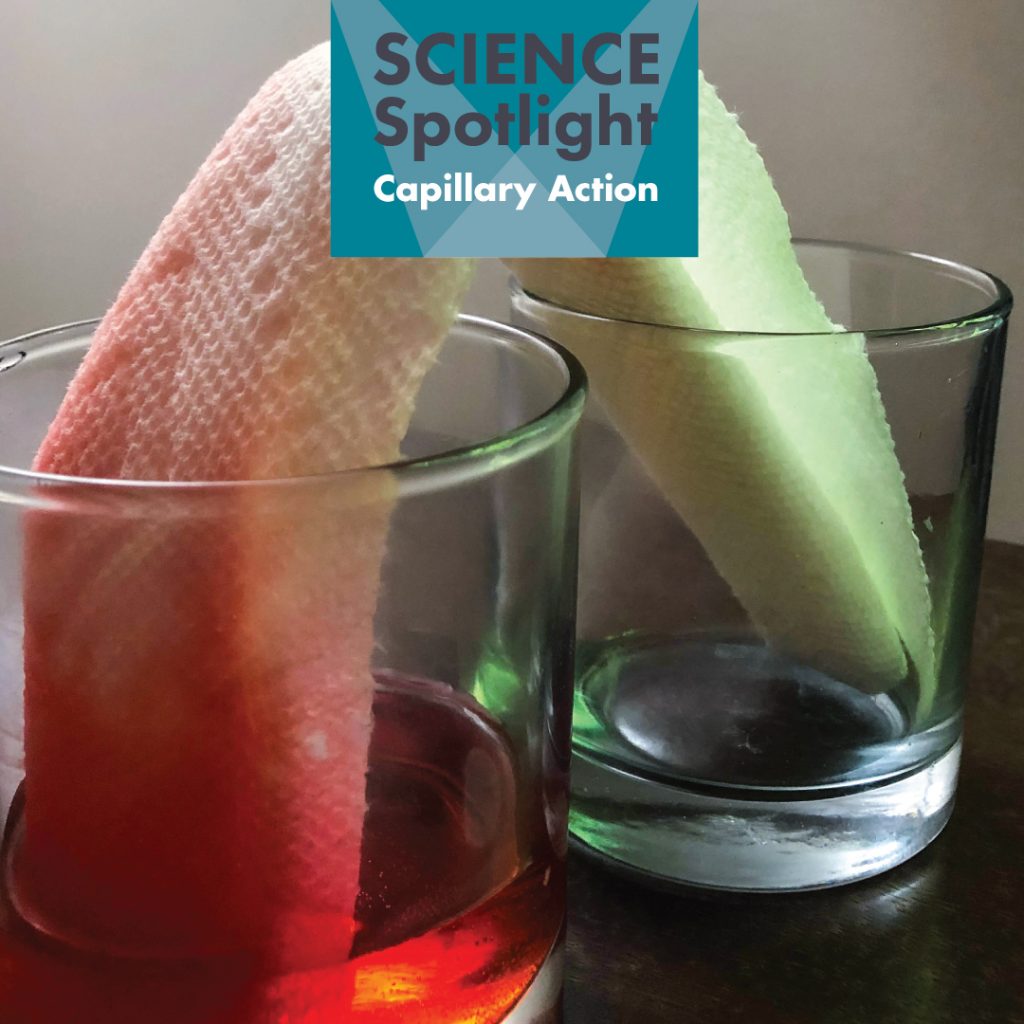
When you water plants, you water their roots. But how does the water travel all the way from the roots of the plant to the leaves? They are standing upright: wouldn’t that defy gravity? In fact, there is a phenomenon known as capillary action that helps plants accomplish this feat, without having to use any magic. Capillary action is the ability for a liquid to flow in very narrow spaces without the assistance of, or even the opposition to, an external force like gravity. Capillary action is possible because of two properties of water molecules – adhesion and cohesion. Water molecules are very attracted to other objects, this is known as adhesion. However, they are also extremely attracted to each other and are known to stick together, this is called cohesion. Plants have a long tubed known as a xylem, which water travels through. Water molecules are more attracted to the xylem than they are to each other. This causes the molecules to adhere to the tube. Because of adhesion, the molecules are strongly attracted to the tube. But, the molecules still want to bring along other water molecules because of cohesion. Cohesion pulls the water upward, as if the molecules were in a chain. Watch water defy gravity and view capillary action yourself with this experiment you can do at home!
Try this fun experiment about Capillary Action!
Materials: Two glasses, cool water, paper towel, food coloring.
Directions: Fill one glass aout ¾ with cool water and add a few drops of food coloring. Take the paper towel, roll it up and place part of it in the glass within the water. Fold it over into the other glass. What do you think will happen with the water?
How It Works: The adhesive force between the paper towel and the water is more attractive than the cohesive force between the water molecules themselves. This pulls the water up and over the bridge!
Want more? Research it! Does this experiment work the same with warm water? Why or why not? Email ECHO at info@echovermont.org to let us know what you find and have a chance at being featured in next week’s edition of the Burlington Free Press and our Facebook Page! We look forward to learning about your research.
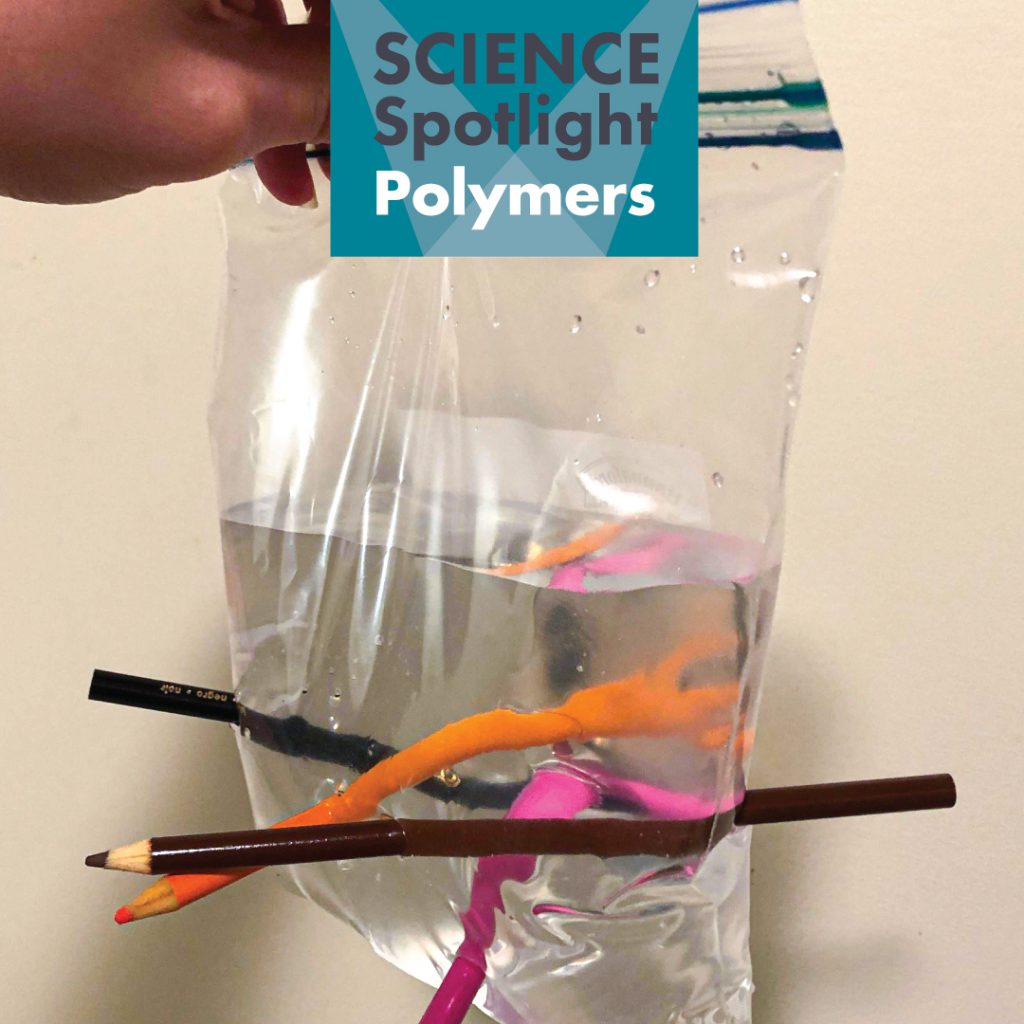
If you look closely at a brick house you’ll notice something very peculiar. All the bricks are layered in a specific pattern. This helps make the house strong! In science we can see something similar with polymers. Polymers are very big molecules that are made up of a bunch of smaller molecules layered together in a repeating pattern. The smaller molecules are called monomers. You can think of monomers like paper clips that link together to form a chain, and the chain is the polymer! Polymers can both be naturally occurring and created in a lab by scientists. Polymers that occur naturally include DNA. DNA is what makes us who we are and contains all of our genetic information. It is made up of long repeating patterns in the shape of a double helix. Polymers that are created by scientists include most plastics. Polymers are what cause plastic to be stretchy. Do you think you can push pencils through a plastic bag of water without making it leak? Try this experiment to find out!
Try this fun experiment about polymers!
Materials: Plastic ziplock bag, water, several sharp pencils.
Directions: Fill the plastic bag about ¾ full with water. Take the sharp pencils and push them through the bag! What happens?
How It Works: When the pencil breaks through the bag, it is inserting itself between the chain of molecules that make up the polymer. The chain of molecules stretches, but doesn’t break. The chain then seals around the pencil and becomes leak proof – no water spills out!
Want more? Research it! Try this experiment again with different sized pencils and different types of plastic bags. Does it always work the same way? Why or why not? Email ECHO at info@echovermont.org to let us know what you find and have a chance at being featured in next week’s edition of the Burlington Free Press and our Facebook Page! We look forward to learning about your research.
The best part about living in Vermont is that we get to experience all of the seasons. Sometimes cool weather appears out of nowhere and we don’t have the proper attire so we rub our hands together to warm them up. Ever wonder why this works? The answer is friction! Friction is a force that acts between two objects that are in contact with one another. It slows or stops movement between the two surfaces that are touching. Friction happens all of the time between all kinds of objects. Rough surfaces will cause more friction than smooth surfaces. More friction means that the object will have a greater resistance to movement. When you rub your hands together, the action of scraping the surface of your skin back and forth against each other causes the molecules in your skin to move a little faster. When molecules move faster to overcome friction, energy is released and the temperature goes up. The friction caused by rubbing your hands together makes them feel warmer. Give friction a try on your own with this easy experiment!
Try this fun experiment about friction!
Materials: Dry rice, pencil, bottle
Directions: Fill the bottle with rice. Take the pencil and put it in the rice, moving it around. Try to take the pencil out – does it come out easily? Put the rice back to normal so there is no pencil hole and stick the pencil in again. Move the pencil up and down gently and tap it on the table a few times. Try to take the pencil out – what happens differently this time? Be patient and keep trying.
How it works: You are creating friction between the pencil and the rice! When you put the pencil in the bottle initially, there is less friction. This means that you can pull the pencil right out of the bottle. But when you put the pencil in a second time and tap the bottle on the table a few times, the rice settles against the pencil and the edges of the bottle. More rice is touching and pushing against the pencil when it is settled. This creates greater friction between the rice and the pencil, allowing you to pick up the bottle full of rice by only holding the pencil.
Want more? Research it!: How would you walk in a frictionless world? Email ECHO at info@echovermont.org to let us know what you find and have a chance at being featured in next week’s edition of the Burlington Free Press and our Facebook Page! We look forward to learning about your research.
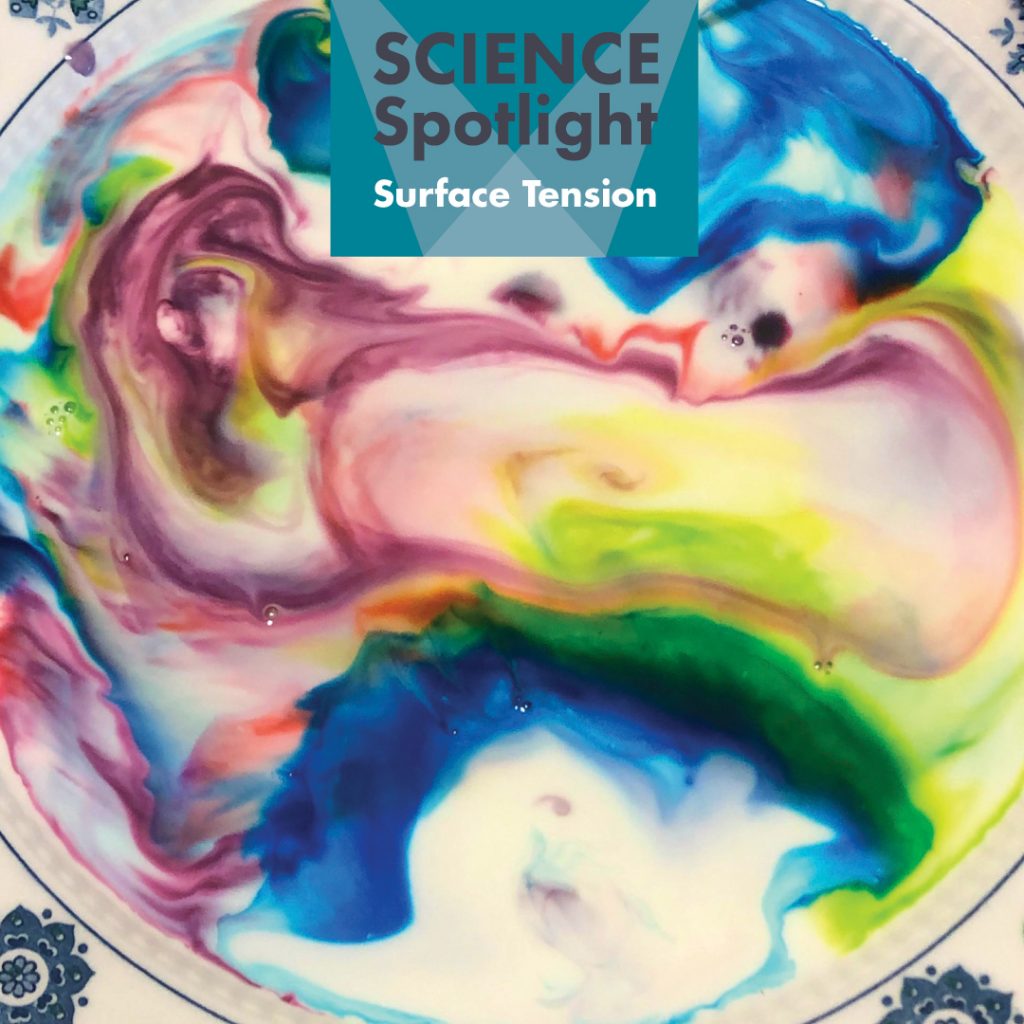
Try this fun experiment about surface tension!
Materials: Plate, milk, food coloring, dish soap, cotton swab.
Directions: Pour some milk onto the surface of the plate. Add some drops of food coloring to the center. Take a cotton swab and put a dab of dish soap on the swab. Stick the swab in the middle of a drop of food coloring. What happens?
How It Works: Surface tension is caused by the force of each of the molecules in the milk pushing against each other. When the dish soap is added, it binds with the fat molecules and reduces the surface tension of the milk. The molecules away from the cotton swab have higher surface tension and pull the milk and the food coloring towards them. This is how you created beautiful art!
Want more? Research it! Does this experiment work with other liquids? Why? Email ECHO at info@echovermont.org to let us know what you find and have a chance at being featured in next week’s edition of the Burlington Free Press and our Facebook Page! We look forward to learning about your research.
Take a moment to imagine a warm summer Vermont day – they’re coming soon! You have the luxury of jumping into a pool to cool off. As you hit the surface it feels kind of hard but you splash in and sink right down. Sometimes if you jump just right, the splash is minimal, but other times you create a wave of water! This is all because of surface tension. Surface tension is caused by the molecules in the liquid being attracted to one another. In most of the liquid, molecules are being pulled up, down, and both sides. This neutralizes the forces. The surface of a liquid has molecules pulling in many directions, but because they are at the top there is no force pushing them down. This causes the molecules to pull in on themselves, creating internal pressure and forcing the surface of the liquid to contract. When you jump into a pool, you are breaking up the tension of the molecules. That is why you feel an initial impact. Try this experiment below to see surface tension in action!
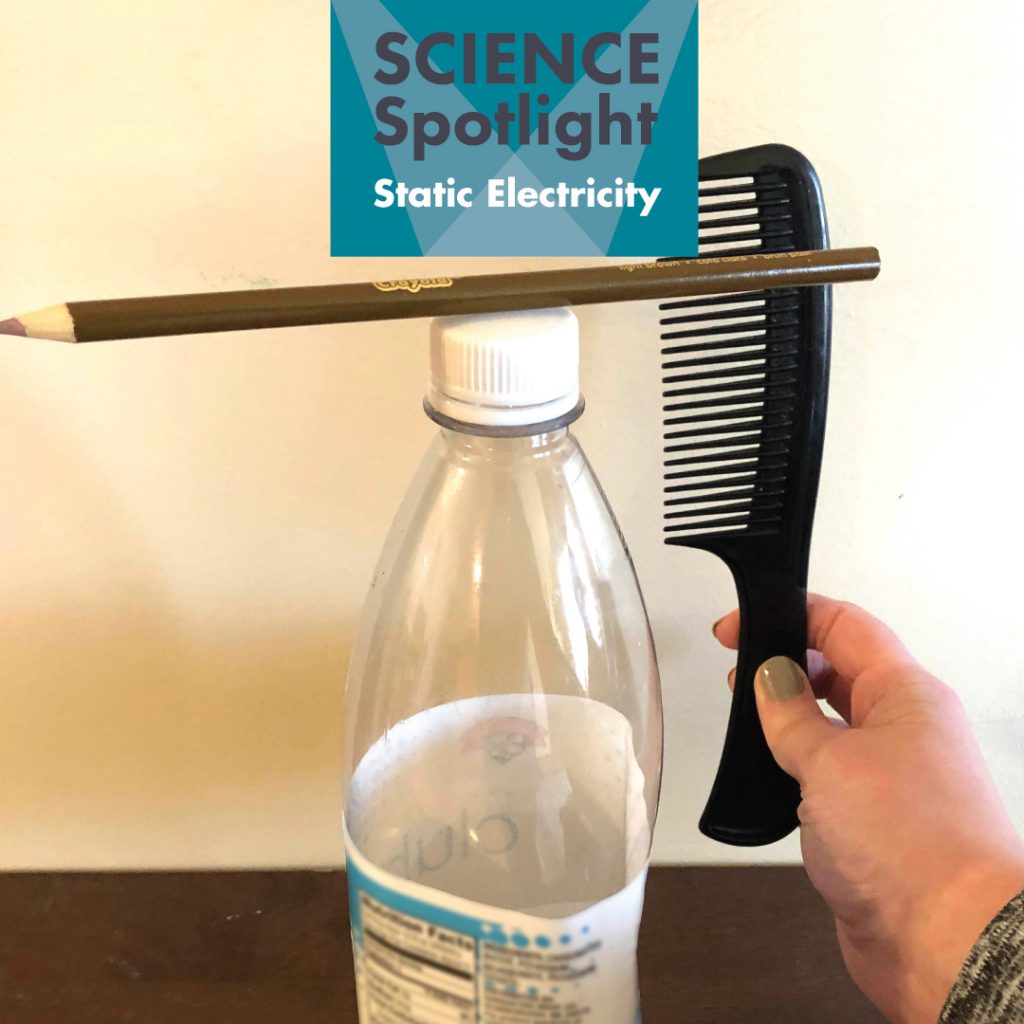
Try this fun experiment about static electricity!
Materials: Plastic comb, pencil, plastic bottle (or something the pencil can balance on)
Directions: Take the comb and run it through your hair for about 2 minutes. Set the pencil on top of the bottle so it balances. Move the comb near the pencil, but don’t touch it. What happens?
How it works: When you rub the comb in your hair, some of the negatively charged electrons are transferring from your hair to the comb. This means that the comb is now overall negatively charged. As you bring the comb near the pencil, you will notice that the pencil will follow the comb even though you are not touching it. It’s not magic, it’s science! The pencil has a positive charge. Opposite charges attract. In this case, that means the pencil will follow the comb as you move it around.
Want more? Research it!: How does static electricity play a role in your printer? Email ECHO at info@echovermont.org to let us know what you find and have a chance at being featured in next week’s edition of the Burlington Free Press and our Facebook Page! We look forward to learning about your research.
In nature we can see some incredible things, including watching lightning strike across the sky! Lightning starts in clouds. Within these clouds there are positive and negative charges that usually live harmoniously together. During a storm, the rough winds and the ice colliding cause these charges to separate and create a static electrical charge! Static electricity is when any material gains or loses electrons and becomes positively charged (when it loses electrons) or negatively charged (when it gains electrons). It’s static because unlike the electricity that turns our lamps on or makes our microwaves work, it doesn’t flow in a circuit. As the two charges grow larger, they can collide within the cloud and the sky lights up. The bright flash of lightning is the energy released during that collision. This is what we see the most often. Sometimes, though, we can see lightning bolts strike down from the sky.
The negative charges within the cloud start to move towards the ground, called a Stepped Leader. From the ground, positive charges begin moving upward – mostly from tall objects or buildings – this is called an Upward Leader. When the negative charges of the Stepped Leader meet the positive charges from the Upward Leader, this is where we see the electrical current and resulting energy release known as a lightning bolt! Want to give static electricity a try for yourself?
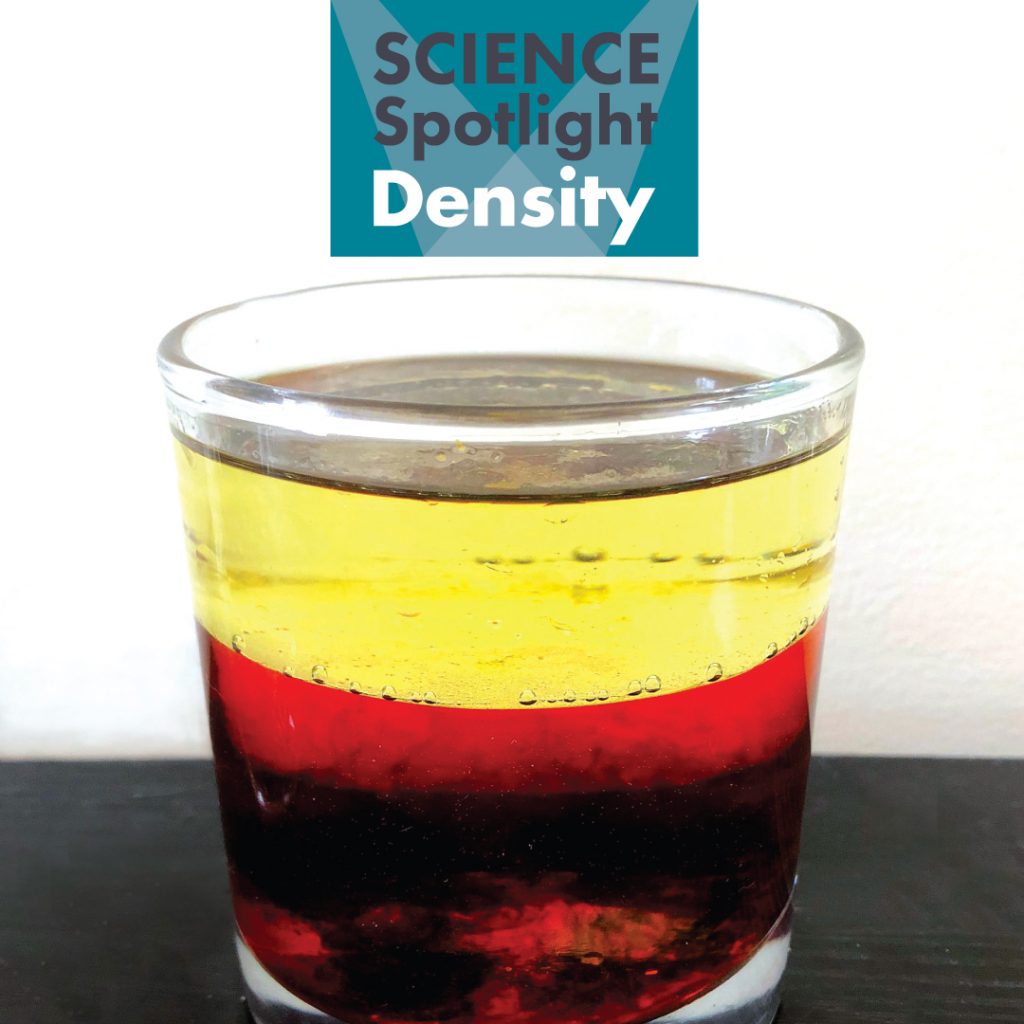
Try this fun experiment about density!
Materials: Vegetable Oil, Water, Salt, food coloring, clear glass
Directions: Fill the glass ⅔ with water. Pour in vegetable oil to fill the rest of the glass. Add a few drops of food coloring and observe what happens. Finally, add salt and watch what happens with the oil and the food coloring! You can continue adding more salt and food coloring as you wish.
How it works: In the beginning of the experiment, the oil settles above the water because it is less dense. When you add salt to the cup, the salt sinks to the bottom of the cup since it is heavier than the other two liquids. The salt carries a blob of oil with it, some of which contains the food coloring. As the salt begins to dissolve in the water, it releases the oil, which floats back up to the top.
Want more? Research it!: Can you figure out how ice floats in water? Email ECHO at info@echovermont.org to let us know what you find and have a chance at being featured in next week’s edition of the Burlington Free Press and our Facebook Page! We look forward to learning about your research.
When walking around the boardwalk in downtown Burlington, you will see so many amazing boats out on the water. How can something as large as a boat float in water when small rocks sink? Boats, and submarines, have a special hidden compartment called a ballast tank to help them accomplish this amazing feat. Ballast tanks are filled with air. When the tank is full of air, the boat is less dense than the water and it will float! Density is the amount of mass in a given volume, or amount of space. Mass is dependent on the number of molecules in an object.
If we change the amount of mass in the ballast tank, the boat will instead sink. Submarines use this trick to travel below the water’s surface. Water enters the ballast tank, which is more massive and contains more molecules than air, causing the submarine to sink. When the submarine wants to rise back to the surface it will push the water out of the ballast tanks and fill them with air. Though the mass inside the tanks have changed, their volume has not, and the submarine can float back up to the surface! Explore density more with this easy science experiment that you can do right from home.
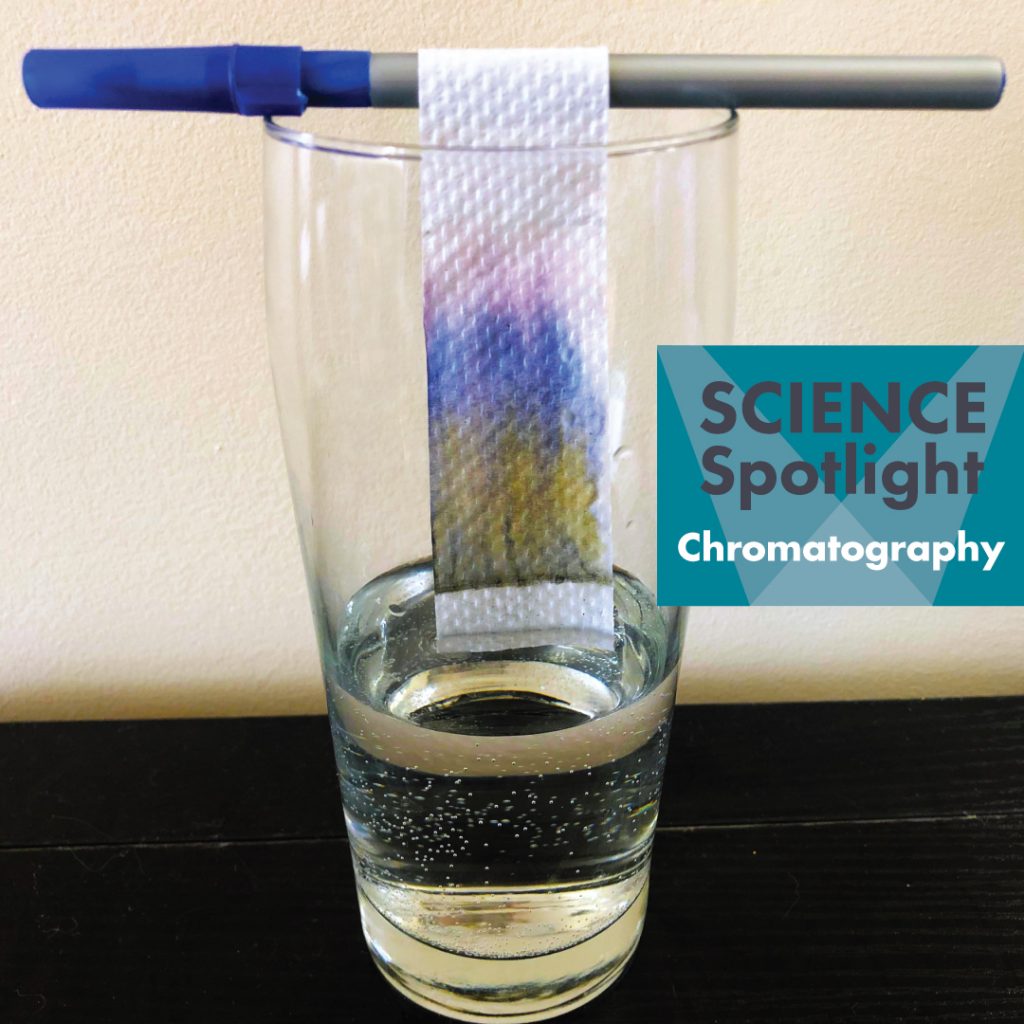
Try this fun experiment about chromatography!
Materials: 1 glass, pencil, paper towel or coffee filter, black Crayola marker (or any color on hand — not permanent), tape.
Directions: Cut a strip out of the coffee filter or paper towel. Draw a line across the bottom with a black marker. Hang the coffee filter vertically in a glass by taping it to the pencil and hanging it over the glass. Add just enough water to be just below the black line. Wait and watch the colors separate!
How it works: This activity is done using paper chromatography. As the liquid moves, it carries the different colored molecules. Molecules of different sizes are deposited in different locations on the coffee filter. Smaller molecules travel farther across the coffee filter than larger molecules. Which colors spread out the farthest?
Want more? Research it!: How might law enforcement use chromatography at crime scenes to help crack the case? Email ECHO at info@echovermont.org to let us know what you find and have a chance at being featured in next week’s edition of the Burlington Free Press and our Facebook Page! We look forward to learning about your research.
Vermont is known for beautiful fall colors. Every Autumn, the green leaves change into a wonderful collage of oranges, yellows, and reds. It may seem like the colors just appear out of nowhere, but they are actually present in the leaves the entire time! During the spring and summer months, leaves work really hard to provide energy for the tree through photosynthesis. Chlorophyll, the pigment responsible for giving leaves their green color, is responsible for this process.
In the fall, as the days get shorter, trees don’t need their leaves to make energy so the green pigment is no longer necessary and the other hidden pigments get a chance to shine. Scientists used chromatography to figure out that the colors were there all along.
Chromatography is the process of separating different components from a mixture. The different parts are separated when the mixture is passed through a medium, trapping the different parts in different places as they move through the mixture. Why do the different parts get trapped in different places? Molecules! Everything in the world is made up of tiny things we cannot see called molecules. These molecules come in many different sizes. In chromatography, we can determine how big different molecules are by witnessing how far they travel. Are there colors that are hiding in objects in your home? Become a scientist and perform chromatography at home!
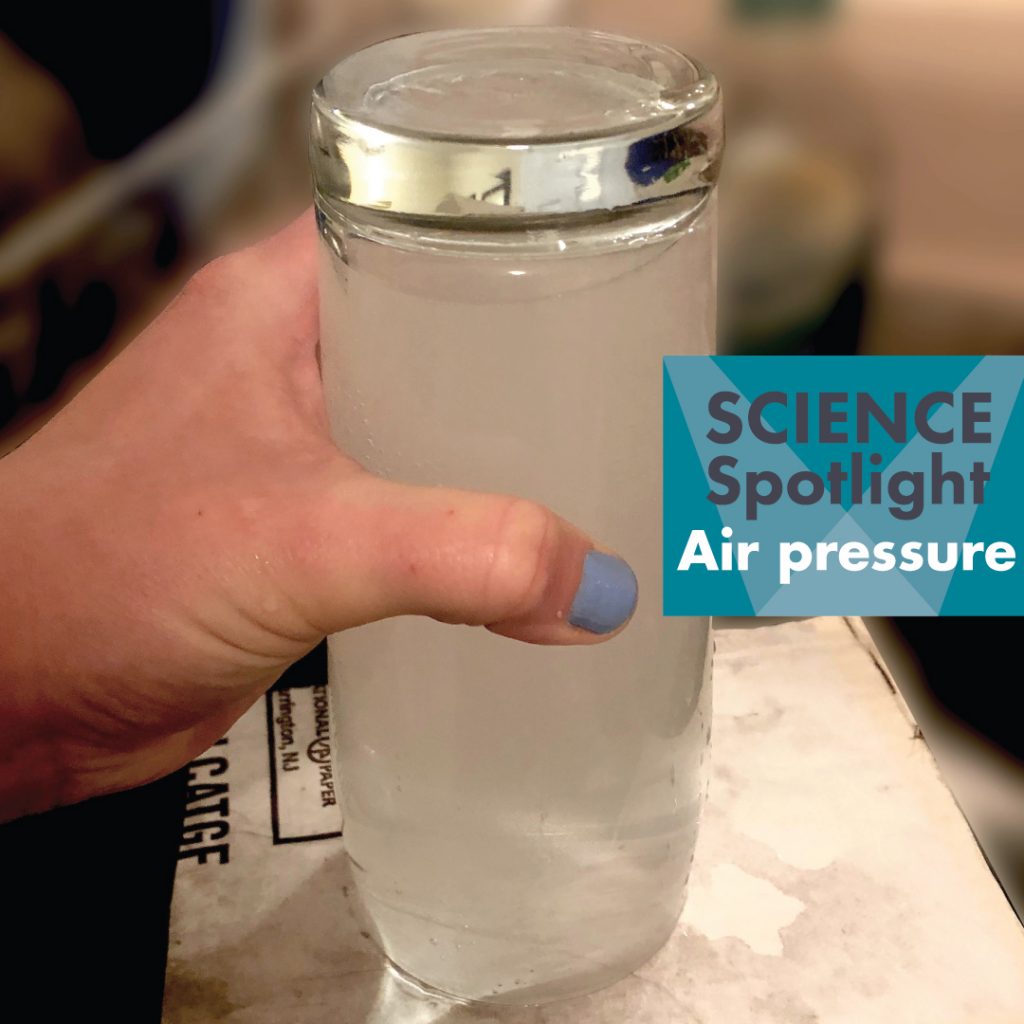
Try this fun experiment about air pressure!
Materials: 1 cup, water, a piece of cardboard or thick paper (wide enough to cover the mouth of the cup) 1 bucket or sink.
Directions: Fill the cup all the way to the very top with water. Place the cardboard over the top of the cup and hold with your hands. Invert the glass, holding onto the cardboard. Remove your hand and notice how the cardboard sticks to the glass and water does not fall out!
How it works: The air pushing up from underneath the cardboard is strong enough to stop the weight of the water from pushing the cardboard down. Because of this air pressure, the cardboard will stay on the glass and the water will not spill out – at least not right away!
Want more? Research It! How do spacesuits help astronauts overcome air pressure challenges while in space? Email ECHO at info@echovermont.org to let us know what you find and have a chance at being featured in next week’s edition of the Burlington Free Press and our Facebook Page! We look forward to learning about your research.
Even though it doesn’t feel like it, the air around us is constantly pushing us in every direction. I am sure you have noticed that you never expand like a balloon or shrink down really small, right?
That is because of air pressure!
Air pressure is the weight of air molecules pushing on the Earth. Every single thing on Earth is being exposed to 14.7 pounds per square inch of air pressure all the time. The amount of air pressure changes depending on where you are on Earth. At sea level, you will experience the most air pressure.
But don’t worry! It is dispersed evenly over your body you won’t even notice it. What happens to your ears when you are traveling up a mountain? Or when you fly in a plane? They pop! Your eardrums pop because they are trying to equalize the differences in pressure from the location you started at to the height of the location where your ears pop. There is less air and as a result, less air pressure the higher up you go. If your body didn’t do this then your eardrums would burst instead. You can experience air pressure in so many ways yourself or through experiments like the one here.
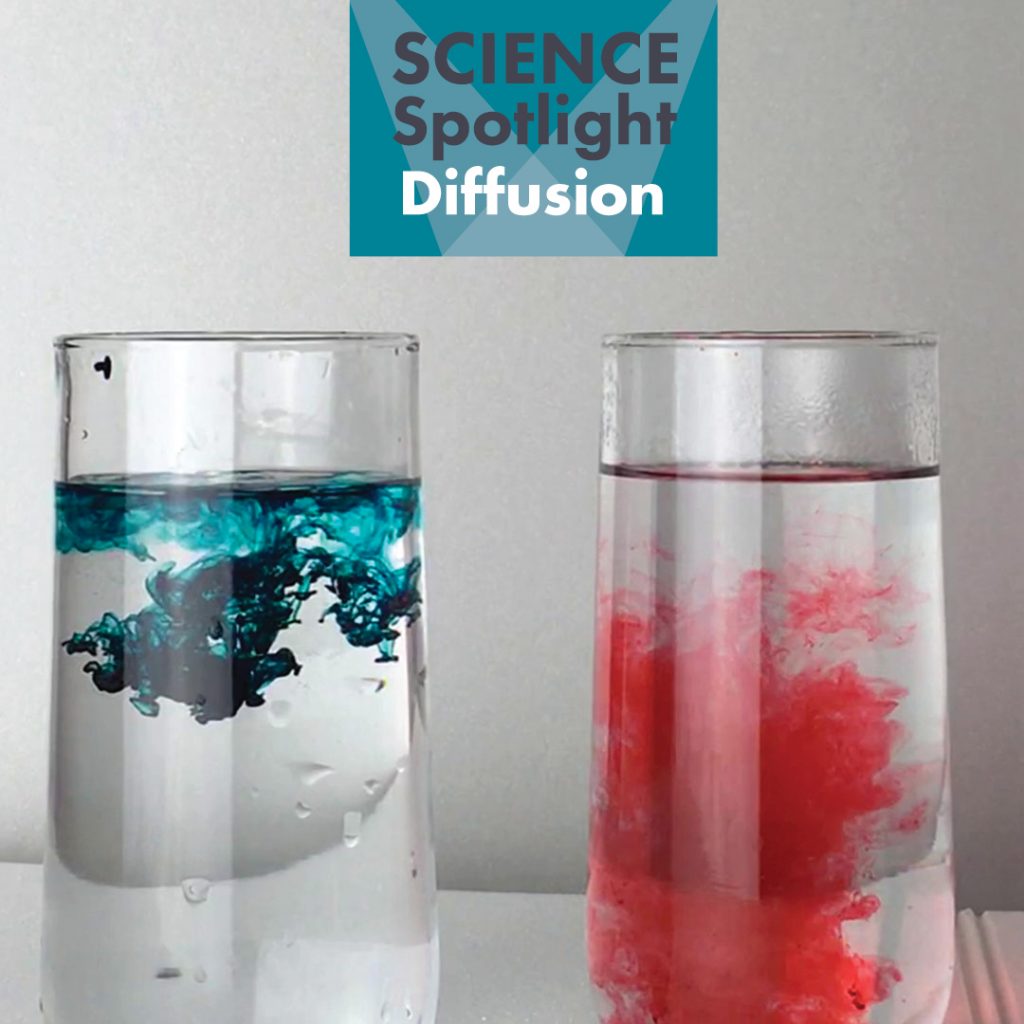
Try this fun diffusion experiment at home!
Materials: You will need two glasses of water, one hot and one cold, and food coloring (one color works, but two is more fun).
Directions: Take the food coloring and place a few drops into each glass of water. What do you notice?
How it works: The temperature of a substance is related to how fast the molecules are moving. Therefore, in the hot water the molecules were moving faster than they were in the cold water. This causes the dye in the hot water to diffuse, or move throughout the water, more quickly!
Want more? Research It! Diffusion happens in things as small as a single cell. Do some research and find out how! Email ECHO at info@echovermont.org to let us know what you find and have a chance at being featured in next week’s edition of the Burlington Free Press and our Facebook Page! We look forward to learning about your research.